On this page:
Refight 2: Rescue
| [Content from Battles Book page 72 to 75.] |
It was a complete shock to the gentle farmers of Silvanos II when the sky was torn in two by a mighty fireball. As the inhabitants of the agri-world investigated the crash site, their dismay grew when they discovered a huge starship of immense proportions half-buried in the tilled fields. Their dismay became horror as hordes of greenskin savages poured from the ramps and airlocks, mowing down the onlookers with gunfire, chopping apart the unarmed crop growers with crude axes and swords.
As Waaa-Ugulbitz swept across Silvanos II a few hardy individuals managed to escape the slaughter and warn the capital, Venguard, of the danger. As the Astropaths projected the Governor's plea for help, an Imperial Assassin of the Callidus temple, who was on the planet for reasons unspecified, received orders to infiltrate the Ork army and discover what she could about their plans.
The cry for aid was received by the White Scars Space Marines, who dispatched a fast attack warship carrying two companies of their finest assault troops. As the Thunderhawks of the White Scars screamed down from orbit, a message was received over the commlink. The assassin had managed to determine much of the Orks' future plans but had unfortunately been discovered before she could slip away. As she tried to escape she had been wounded and was now holed up in a ruined farmstead as the Orks scoured the countryside for her.
The White Scars acted with their customary speed, despatching a small force to secure the farmstead and form a defensive perimeter against the incoming Orks. As the greenskins poured towards the ruined outbuildings more White Scars were on their way, punching through the Ork army to take the assassin and her information to safety.
The following special scenario rules are used in this scenario: Objectives.
Forces
Each player picks their army to a pre-agreed points total. Although the original battle was fought between Orks and the forces of the lmperium, any two armies may be used in this scenario. The actual forces which fought this battle are listed at Historical forces [Battles Book page 75].
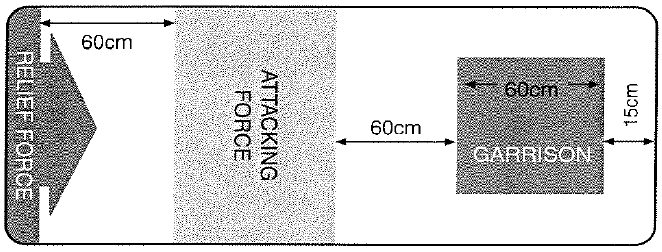
Set-up
- Set up the terrain using any mutually agreeable method. In this scenario, the game is played down the length of the board with both armies deploying in a set order. Once all the terrain has been placed, both players roll a D6 with the person rolling the highest score becoming the defender.
- The defender may deploy up to a quarter of his army points total as the force protecting the vital assassin, deploying them anywhere on the board in the area marked 'garrison'. All of the rest of the defender's units make up his relief force (see below). The defender may only use complete detachments as part of the garrison, and the total points value of the detachments used must not exceed a quarter of the points of his army in total.
- Once the defending units are all deployed the attacker positions his entire army in the area marked on the deployment map.
- Finally, the defender's relief force is set up by placing the HQ unit of each of their detachments on the relief force table edge. Every HQ after the first must be placed within 15cm of the position occupied by the first HQ that is placed. The position where the HQ is placed shows where the units from that detachment will enter play, and is where their move must be measured from on the first turn. If several detachments want to enter at the same point (along a road, for example) simply place the HQs in a row, one in front of the other, and measure the moves from the rearmost HQ in the row.
- The defender may split off one detachment per 1,000 points in his relief force as a 'flanker', if he wishes. The HQ unit for a flanker can be placed anywhere along the player's table edge; it does not have to be placed within 15cm of the first HQ that was placed.
Objectives
The defender sets up a single Rescue objective counter anywhere in the area occupied by his defending garrison.
Victory conditions
The defender wins the scenario if the assassin leaves at the board edge that her relief force entered on by the end of Turn 6. It is considered a draw if you have control of the assassin but haven't exited her from the board. The attacker wins the scenario if he has control of the assassin at the end of any turn. Anything else is a draw.
Tactics
Probably the best mix for the defending garrison is a mix of infantry armed with heavy weapons and tough assault units. Put the infantry on overwatch with a clear view of the approaching enemy and surround the assassin with a bodyguard of the best all-round infantry you have. Some good examples are Space Marine Terminators, Imperial Ogryns, and Ork Nobz. Some careful consideration is needed when deploying your garrison as too tight a deployment could be inviting heavy casualties from barrage weapons.
Alternatively you can use a fast-moving force as a garrison, and hope to break out and join the relief force. In order for this to work the break-out force will have to be able to move very fast indeed in order to keep out of trouble, and you'll need to time the break-out carefully otherwise you'll be overwhelmed by the vastly superior attacking army.
As far as the relief force goes, a more general selection of tanks, artillery and Titans is needed to engage the enemy while some fast units attempt to punch through and effect an early rescue. Although your opponent should be fully prepared for an attack against his rear, the disadvantage of fighting on two fronts can be enormous. Any close combat troops that can reach his lines should attack the units that are on Assault orders, as these are probably the ones destined to assault your garrison. You should then attempt to pick off the ones you can't reach with your long-range firepower and super heavy weapons. Remember, the more pressure you can take off your defending garrison the better. Above all the object of this game is to rescue the assassin, not inflict casualties on your opponent, so don't allow yourself to be sidetracked.
The attacker has two main tactics. The first is to use the bulk of your army to engage and slow up the relief force, while a smaller group attempt to pry the assassin loose of her garrison. Once the situation to your rear has stabilised, and degenerated into a more straightforward battle, you can pull out more units to attack the garrison. Your second choice is to attack the defending garrison with as much of your army as possible in an attempt to overwhelm and destroy it before the relief force can arrive. The added bonus of this tactic is that you will then revert to fighting on only one front.
Optional rules
Transport flyers like Space Marine Thunderhawk gunships or fast skimmers have the potential to win the game easily for both sides. Players may wish to agree to limit the number of flyers and skimmers used — ban them altogether if you feel their presence makes the scenario too easy.
Historical forces
The forces that fought this battle are listed below.
Orks: The Ork player has the following detachments:
Detachment 1 — Badruk's Speedas, comprising one Warboss Stompa, six Ork Boyz units and six Battlewagons.
Detachment 2 — Urglag's Blastas, comprising one Warboss Stompa, three Shooty Boyz units and three Big Gunz.
Detachment 3 — Grizzard da Magnifisunt (an' der Ladz), comprising one Warboss Stompa, three Boarboyz units, three Stormboyz units, three Kommandos units, three Bikeboyz units and two Battlewagons.
Space Marines: The Space Marines have the following detachments:
Detachment 1 — Force Hachiman, comprising one Space Marine Captain, two Assault squads and two Scout squads. Historically it was Force Hachiman who defended the assassin.
Detachment 2 — Force Kharira, comprising five Land Raiders and five Whirlwinds.
Detachment 3 — Force Krysha, comprising one Space Marine Captain in a Rhino and three Tactical squads in Rhinos.
Aftermath
The Whirlwinds and Land Raiders of Force Karira punched through the Ork line, suppressing the Shooty Boyz and Big Gunz of Urglag's Blastas. With this safe corridor established, the Tactical squads of Force Krysha managed to break through and link up woth Force Hachiman and the Assassin. However, Force Hachiman was in bad shape after an assault from Grizzard the Magnifisunt's Boyz was barely stemmed by the heroic sacrifices of the White Scars' Scout squads.
The wounded assassin was transferred to a Rhino and Khan Krysha ordered his remaining Space Marines to mount up and make a break for safety , speeding through the wrecks of Ork and Space Marine tanks while the remnants of Force Hachiman attacked the Orks again. Caught betwenn the threat of the Assault squads and the need to stop the Space Marines escaping, Badruk's Speedstas tried to break off from the attack on the farmstead only to be cut down by lascannon fire from the surviving Land Raiders. Urglag's battlewagons were destroyed and he had no way to catch the rapid moving Rhinos which were slipping through his grasp. In sheer frustration he led the remains of his force in a final, vengeful attack on the few tanks left in force Kharira, wiping them out at great cost, while the White Scars disappeared into the mountain passes.